What Kind of Files Can Be Uploaded to Second Life
Just as nosotros can texture individual faces of a archaic differently, we tin texture individual faces of meshes differently if the mesh has been properly prepare for materials before import.
Adding Materials With Your 3D Program
To add together Materials in Blender, refer to these ii pages in the Blender Manual regarding creating/adding materials, and applying multiple materials to a model.
- http://wiki.blender.org/index.php/Physician:2.5/Transmission/Materials/Options
- http://wiki.blender.org/index.php/Md:ii.5/Manual/Materials/Multiple_Materials
Autodesk Software users
If you are using Autodesk software to create your multifaced mesh, due to the style the uploader is currently behaving [ June, 2016 ] , please refrain from using spaces in your material names. Autodesk 3ds max by default names most 'Standard' materials "Cloth #33", "Material #34", "Material #35". The mesh uploader shortly is truncating those names to all exist "Textile" , "Material" , "Material" (ignoring the infinite and everything afterwards it) which then makes all MatID faces reference the same texture aqueduct, creating some sort of abstruse object that seems to have multiple material faces in world, but simply resets the moment it's moved, picked up, or adjusted in any style. To avoid this, try renaming your materials "Mat_A" , "Mat_B" , "Mat_C" or some other sort of naming convention that does not use spaces. Note: Underscores are perfectly valid characters.
Maya 2012 users
- selecting faces, apply few different lambert materials to your object, up to 8 per object.
- then consign as FBX file, don't export in maya as dae directly, information technology won't work.
- so utilise the Autodesk FBX standalone converter version 2011.3 to convert to Collada.
- the dae file is then ready for import.
download the needed standalone Collada exporter here:
- http://us.autodesk.com/adsk/servlet/pc/item?siteID=123112&id=16126812
Get a 2d Life uniform mesh file
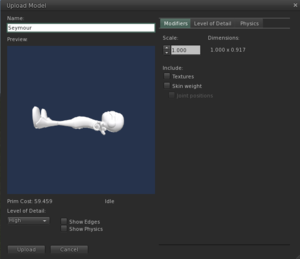
The commencement step is to get a multi-face up mesh file that you want to upload to 2nd Life. Second Life's mesh import is able to read COLLADA (".dae") files.
- Click this link -- https://collada.org/owl/download.php?sess=0&parent=131&expand=1&order=name&curview=0&binary=1&id=707 -- to download the "seymour.dae" COLLADA file.
- Relieve the file anywhere on your hard bulldoze where y'all can find it subsequently.
Upload the mesh file to Second Life
Upload the mesh file from your computer to 2nd Life:
- Select Build > Upload > Model from the menu at the summit of the 2d Life Viewer.
- Alternatively, open My Inventory, click the + button, and select Upload > Model.
- A file upload window opens.
- Find and select the
seymour.daefile from your computer.- The Upload Model window appears.
- Enter a name for your model in the Proper name field.
- Click the Upload button.
- A new asset will appear in your inventory in the Objects folder.
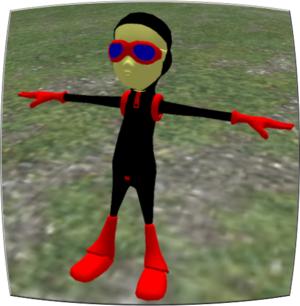
- The new asset is named boyShape.
Warning!
While the Seymour asset does contain a rig, information technology is incompatible with the current Mesh Project Viewer lawmaking. If you enable Skin Weight before uploading, Seymour'due south skin volition be generated incorrectly. You'll see the wrong beliefs in the tool preview window, and if uploaded, you'll see a group of large flickering triangles inworld.
Add together your mesh object to the earth and edit information technology
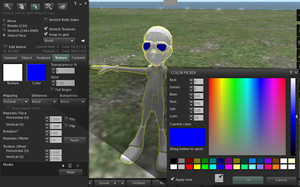
You can now manipulate your mesh as if it were whatsoever other object in your inventory:
- Find your boyShape object in your Objects folder; if you're having trouble or have a big inventory, use your inventory's Recent tab.
- Drag the new object from your Objects folder to anywhere on the footing where you lot have permissions to build.
- The model appears on the ground.
- Right-click the model and select Edit.
- The Edit Object window appears.
- Click the Select Face radio button.
- Left-click the goggle lenses of the model.
- Click the color swatch in the Texture tab and change the colour, or click the texture swatch and modify the texture.
- Add together color and/or textures to other parts of the model (gloves, goggle frame, face, or cap) in the same way.
<videoflash type="youtube">qorvd6KJSuE|640|505</videoflash>
Source: https://wiki.secondlife.com/wiki/Mesh/Uploading_a_multi-face_mesh
0 Response to "What Kind of Files Can Be Uploaded to Second Life"
Post a Comment